Showing posts with label lunch. Show all posts

Thursday, May 30, 2013

Hot and Spicy Prawn Noodles

Electrolux was running a very interesting competition on twitter to promote their involvement in Cannes Film Festival. The competition was to upload a photo of a dish that you have cooked and link it to a movie that goes with it. And if you are the winner then you get to dine in a Michelin Star restaurant. tempting isn't it? I tweeted my current cover photo and guess which movie I went for. Well its pretty obvious, Chocolat ! Since then I have kept my fingers crossed and not opened yet! Metaphorically of course otherwise life will be pretty tough!

photo

Apparently Electrolux products like Built-in oven and induction hobs  are very popular with Michelin star chefs. I was looking to change my oven recently and if it is good for Michelin star chefs it should be great for a home cook like me. However I would be grateful if you let me know which oven you use and what would you recommend me to have. It will be a great help for me when I buy the oven.

photo (3)

Now, this bank holiday weekend was sunny, warm, clear blue sky for us which is a very rare combination here in this part of the world. To match up to the weather I tried a spicy hot prawn noodles at home. It is a go with the flow recipe really, just throwing what ever I had in the fridge in the the wok and mixed with the flat white Vietnamese's noodles I got from  the Asian store.

photo (2)

Ingredients:

Flat noodles

200gm King prawns (raw)

1 Onion (sliced lengthwise)

2-3 Garlic cloves (chopped)

1 tsp Ginger (thinly sliced)

2 Spring onion (chopped)

Mushrooms (thinly sliced)

3 Red Peppers (long and thin ones, not the bell pepper, sliced)

1-2 Green chillies (chopped)

2-3 tbsp Spicy chilli bean paste

2 tbsp Soy sauce (light)

Salt

Oil

photo (1)

Method:

Cook the noodles in the salted boiling water for the time its mentioned in the pack. I did it for 8-10 minutes. On the other hob heat a wok with 3-4 tbsp of oil. Once the wok is smoking hot first fry the raw prawns for 2-3 minutes or until they turn pink. Fish them out of the wok and keep it separate. Now add the ginger and garlic to the same oil, fry them a bit then add rest of the vegetables and continue to fry. Keep stirring continuously. Add the soy sauce and the spicy chilli bean paste and keep stirring. Meanwhile check the noodles if its done. Don’t overcook it else it wont be nice. When the vegetables are ready add the prawns and the noodles to it and mix well. Take it off the hob, sprinkle some chopped spring onion on top and serve immediately. 

Wednesday, January 4, 2012

Speedy Chicken Soup Noodles

SCS_524

Now that Christmas and New Year celebrations are over, most of us are back to work. I am not joining work as yet. With my hands full at home with the little one, I hardly get time to do anything else really. I guess that’s what is making me think of all the shortcuts I can make in the kitchen and try and cook speedy one pot meals which are ready in least amount of time yet tastes good.

I try to keep some cooked meat in my fridge most of the time, they are such a life saver when you need some easy meal to be prepared. You can either buy them in the supermarkets or could be the left-over meat from last night’s supper. I had some store bought cooked chicken in my fridge which I have used to make this easy-peasy soup noodles. I made this up on the go so the measurements are really up to you. I used Lee Kum Kee brand spicy chilli-bean paste for this dish. This magic ingredient is available in most Asian food stores and truly transforms this noodle soup. You can adjust the quantity of chilli bean paste based on your tolerance/preference to hot and spicy food. 

SCS_529

Ingredients:

200 gm thick noodles (udon or soba)

100 gm cooked chicken (sliced into small pieces)

1 and 1/2 cube of vegetable stock powder

Spicy chilli bean paste (to your taste, I added 2 heaped teaspoon)

400 ml boiling water for the soup

1 onion chopped

1 capsicum thinly sliced

3 Chestnut mushroom thinly sliced

Oil for frying

SCS_530

Method:

Heat the oil in a pan and start frying the onions till they turn golden. Now add the chopped capsicum and mushroom to it and continue frying. Meanwhile in a sauce pan pour boiling water and cook the noodles according to the instructions on the pack. In a bowl pour the 400 ml boiling water and make the stock by dissolving the stock cube. Add the cooked chicken in to the onion and capsicum mix and stir well. Cook for a minute or so then add the chilli bean paste to it. Now add the stock into it and mix it well. Bring it to boil and cook for a minute or so then add the noodles and take it off the heat. Serve hot.

I garnished the soup with fresh coriander leaves.

Friday, December 2, 2011

Hot Chilli Pasta–Easy Meals


Hello everyone!

Coming back to blogging after a long time. I was so busy during last couple of months that blogging had taken a back seat in my to-do list. I am not free yet and not sure I will ever going to be but I hope to get a little bit of time for blogging in future and be more regular here. For those of who don't know, we have been blessed with a baby boy last month. Since then he is been and will remain the centre of our world for the years to come. It’s an amazing experience. I hardly get time now a days because of obvious reasons. 

CB_54

This is something I made when I used to be alone and didn't want to spend a lot of time in kitchen for a decent looking plate of food. Now I am making it because I have very limited time. either way this works for me all the time.

HCP_4

Ingredients:

Handful of pasta I choose Spaghetti but you can have any thing you like

Enough boiling water to cook the pasta

Salt

4 tbsp Oilive oil (or more if you like)

2 cloves of garlic (finely chopped)

1 whole fresh chilli finely chopped (preferably red)

1-2 tsp of dried flaked red chilli

Handful of freshly chopped parsley

2 tbsp lightly toasted pine nuts

1 tbsp of lime juice

Handful of grated cheese (optional)

HCP_14

Method:

Cook the pasta in salted boiling water as per the instruction on the packet. Once the pasta is cooked drain the cooking water and set the cooked pasta aside. While the pasta was getting cooked, in a separate pan dry roast the pine nuts and keep it separately. Heat the olive oil in the same pan and add the dried flaked red chilli in to it. Fry for a minute or less and then add the fresh chilli and garlic in to the chilli flavoured oil and cook for a minute. Add salt, lime juice and the chopped parsley to the pan and mix well. Now add the cooked pasta in to the pan and mix the whole thing together. Serve hot with some cheese on top and your choice of wine or any other drink you prefer.

Wednesday, October 19, 2011

Payesh and Bengali Misty Pulao

DSC_1005

Bengalis are known for their sweet obsession, especially people from West Bengal. Apparently we are accused of adding sugar to every dish that we cook. I am sure that’s not true but I think for most dishes salt and sugar balances the taste of the dish rather than using only salt. Rice is an integral part of many cuisines but in India, it has meaning more than just food. We use rice grain in pujas, festivals, wedding or any auspicious occasion rituals . The list is countless. Hence its only obvious we will have countless cooked rice dishes as well.

DSC_1001

We recently had a small celebration at home and my mother prepared the two rice dishes that I love the  most. For special occasion like this and special rice dishes which are so close to my heart I use the best rice I trust and that is Tilda Pure Basmati Rice.  The first one is the Bengali Misty Pulao and the other one is Payesh (Rice pudding). The first one we have at the beginning of our meal and the second one we have at the end of the meal.

Bengali Misty Pulao:

DSC_1027

Ingredients:

2 cups of Tilda Basmati rice washed, drained and dried

1 Bay leave

3-4 cloves

3-4 green cardamom

1 2” cinnamon stick

2-3 tbsp Ghee

few raisins and cashew nuts

salt

2 tbsp suger

1/2 cup of peas, finely chopped carrots and capsicum (you can use frozen mixed veg, that reduces a lot of effort)

4 cups of boiling water

Veg_109

Method:

Heat the ghee in a  deep bottomed pan (you need a pan with a lid) and fry the cashew nuts and raisins in it first. Once they are lightly golden brown, remove them from the pan and add the whole spices for frying. About a minute later you start to get the aroma of the spices and ghee, add the rice into the pan and continue to fry. Keep the heat in medium and stir so that nothing gets burnt. In a separate pan fry the vegs with little salt. When the rice begins to change the colour add the fried vegs, raisins and cashew nuts and mix well. Now add the water. Add exactly double the amount of rice you use, no less no more. give it a good stir and the salt and sugar into it. Now cover the pan with a lid, keep the heat in medium and let it cook for next 10 minutes without any disturbance. If you are using a glass lid you will be able to see the rice absorbing all the moisture and becoming fluffy. Turn off the heat and let it rest for 2-3 minutes, then use a fork to lightly stir the rice to make it even fluffier. Bengali misty pulao is ready to serve. You can serve it with any meat or veg dish or even just like that.

Payesh:

Payesh_1029

Ingredients:

1/2 cup of Tilda Pure Basmati Rice (Washed and drained)

Boiling water

1 litter full fat milk

200 ml of double cream

200 gms of sugar or if you can get some date jaggery than that will be great

Handful of cashew nuts and raisins

Ghee

1 bay leave

2-3 green cardamom

Payesh_990

Method:

Boil the milk in a pan with the bay leave and the green cardamoms over medium heat. Be careful that the milk should not spill out or get burnt at the bottom. To prevent this keep stirring the milk time to time. Melt and mix the ghee into the washed rice and when the milk begins to boil add the rice into it slowly. Keep stirring. Add the sugar/jaggery into the milk an rice mixture and keep cooking over medium to low heat. After about 6-7 minutes you will notice the milk has reduced and the rice is almost cooked, now add the double cream and check for the sweetness of the payesh. If required add more sugar. Now add the raisins and the cashew nuts and continue to cook with stirring occasionally. Cook for another 5 minutes or till the rice is done and then take it off the heat and let it rest. Serve it hot or cold, I personally prefer cold.

Wednesday, July 27, 2011

Sweet Pasta for Kids – Garofalo’s Pasta

 DSC_0655

I know pasta usually are made as savoury dish but when it comes to kids you need to think differently. Kids loves sweets especially colourful sweet in different funny shapes. They also love chocolates. So when I found out about Garofalo’s Pasta Competition, I thought of doing a different pasta preparation than usual savoury or meat pasta. Hence I decided to do a sweet pasta. I asked for samples and when I received them from Garofalo, it made me smile. The shapes of the pasta were so cute that any child would have lots of fun eating this pasta. They are in shape of little stars, moons, dolls and cars. So very adorable.

 DSC_0659

The pack said boiling the pasta for 12 minutes in water would be sufficient but I had different plans. I wasn’t going to boil in water instead I boiled in milk. I know from personal experience that for some kids it’s difficult to make them drink milk. So this will be a good way to feed them milk. But I had to make the pasta look attractive as well as taste good so here is what I did.

  DSC_0665

Ingredients:

100 gm Garofalo’s Kids Pasta

250ml full fat milk

4 tbsp honey (you can adjust the sweetness according to your kid’s taste)

Handful of chopped mixed nuts

Handful of Pistachio lightly crushed

Handful of dried golden raisins soaked in water 

Handful of chocolate chips

2-3 tsp of multicoloured sugar sprinkles (optional)

  DSC_0662

Method:

In a deep bottom pan heat the milk and bring it to boiling point then add the honey to it and give it a mix. Now add the pasta and let it cook for 12-14 minutes on low heat to prevent milk from overflowing. Keep stirring as you don’t want your milk to be burnt or the pasta to be stuck at the bottom of the pan. Towards the end add the soaked raisins and the chopped nuts and give it a stir cook it for 1-2 minutes more when you see the milk has thicken and the dish has got a creamy texture along with the pasta cooked, take it off the heat and let it cool down. Place it in the fridge for some time then pour the pasta in your kid’s  favourite bowl and add the rest on the ingredients on top of it.

DSC_0656

Serve cold. You can serve this as an evening snacks or like a small meal or dessert. I bet kids will love this.

garofalo

Wednesday, July 20, 2011

It’s Pizza time –Domino’s

I am a huge pizza lover. A big one! Not only because it tastes great but it saves me from cooking dinner on weekdays (sometimes on weekends too!). It is an ideal meal for lazy cook like me and on top of that when it is from Domino’s then I don’t need to say how good the pizza will taste. So when Domino’s offered me to review their Stuffed Crust Pizza I was very excited and was looking forward to it.DSCP_657

On our way back from office we went straight to the Domino’s  shop and ordered a large, half and half pizza with one half filled with Hot and Spicy and the other half was Tandoori Hot. Couldn’t wait for long! The waiting time was around 10-12 minutes and I saw how they make it from the scratch! In the kitchen she took a fresh piece of dough and started making the pizza base with corn meal. I was amazed to see that she didn’t use any rolling pin to make the base instead she made a perfectly even base just by pressing and circling the raw dough on the surface.

  DSCP_662

Next she placed a ring of fresh mozzarella cheese circling around the base and turned the edges to cover the cheese to make it stuffed crust. Rest was simple, she topped the base with Domino’s own tomato sauce and rest of the topping with generous helping of fresh mozzarella cheese on top and placed it in the oven.DSCP_663 

You need lot of patience to bring that piping hot freshly made pizza home and photograph it before having a bite. For that I probably deserve another such pizza! But anyway I did all that and then finally when I had the first bite into it, It felt great!

DSCP_665 

The pizza was very soft with a melt-in-the-mouth texture. The tandoori chicken pieces were well cooked and added the perfect spiciness to the melted cheese and the soft pizza base. All of us agreed that it was a perfect pizza we had in long time. If you want to treat yourself with pizza at any time or just having a party with friends then this is a very good thing to order. They do some awesome meal deals, just go here to find out more about it and enjoy them to the fullest. 

Sunday, July 3, 2011

Sorshe Ilish (Hilsha Fish in Mustard Sauce)

Hilsha or as we call it “Ilish Maach” is a hot favourite of most Bengalis. We love fish and among all types of fishes Hilsha is the king in taste. No matter what you make with Ilish maach, its going to taste great! Back home you can get this fish fresh from the market but here in UK we get it in Indian shops, frozen and at least 8-10 months old. I am happy with that. Something is better than nothing. At least I get to eat it once in a while.

SPI_1434

Sorshe Ilish is also called Ilish maach er jhal and one of my favourites. Ideally yellow mustard seeds are used to make the paste but I think they are bit difficult to find here. So I used black mustard seeds. The biggest problem with the black mustard paste was a bitter after taste I used to end up with each time I cook it. I have tried different techniques to get rid of the bitter taste but never been that successful. Finally I switched to English mustard which is a great shortcut for me and easily available in the supermarkets.

SPI_1435

This is a very easy to make recipe if you have all the ingredients handy. Also, if you don’t have Hilsha you can use Herring which tastes similar to Hilsha. 

SPI_1438

Ingredients:

800 gm Hilsha (cut in to pieces)

2 tbsp of English mustard paste

2 tbsp of white poppy seed paste (We call it posto in Bengali)

1 tsp of nigella seeds

1tsp of turmeric powder

1 tsp red chilly powder

3-4 fresh green chillies

3-4 tbsp Mustard oil

Salt

SPI_1439

Method:

Clean the fish and lightly rub them with little turmeric and salt and keep it separately. In a bowl make a mix of the english mustard, poppy seed paste, turmeric, chilly powder and salt. In a frying pan heat the mustard oil and shallow fry the fish pieces. Remove the pieces from the pan and add the nigella seeds and the green chillies in the remaining oil, fry for a minute then add the mustard-poppy paste to the hot oil. mix it well then add the fish pieces and cover them in the sauce. Cover the pan and cook it for 1-2 minutes and then remove from the heat. Serve with plain boiled rice.

Saturday, January 22, 2011

Courgette Paratha

I have this really weird habit of picking up things that I really don't need while shopping. I know it’s a common complaint many men have against their wives, but I think I do it more often than I realize. Especially when I am doing grocery. I end up buying things and then keep thinking what shall I do with them. That is exactly what happened when I last went to the supermarket. I bought 1 kg of Courgettes (2 packets, around 6 of them). Then I forgot about them. I rediscovered them back in my refrigerator three days after I bought them. They were buried under the tomatoes, the green beans, the mushrooms, the green chillies, the coriander etc. etc. Well, now you know how my veg. basket looks like :)

CP_15

Anyway, when I rescued the courgettes underneath all these vegs, I started to worry that what do I do with them. These are similar to a veg we get in India called “Lauki” in Hindi and “Lau” in Bengali. The typical dish that we make with these are with prawns called “Lau-Chigri” which we had recently. I looked in the internet and guess what I found a recipe in BBC Good Food called “Indian Bread with courgettes and coriander”!! That was unusual!! I didn’t expect that at all!! So I thought of giving it a try and an hour later, there I was serving courgette paratha for dinner. As usual I didn’t follow the recipe word by word and started adding different things and made my own version of it. I must tell you it’s quite difficult to handle the dough when you are using fresh raw veg as it releases lot of water and  becomes a nightmare to get the right dough consistency but the finished product was good. I loved it. Hope you like it too. 

 CP_32

Ingredients:

3 Courgettes / 500gms  (pealed and grated using the coarsest side of the greater)

1 tsp cumin seeds (dry roasted and made into dust)

1 tsp red chilli powder

1 tsp garam masala powder

200 gm of plain flour and some extra for rolling the paratha

200 gm of roasted chick peas flour (we call it “Chatu” in Bengali) (you may find this in Indian store or replace with whole meal flour)

3 tbsp rice flour

2 tsp grated root ginger

3 tsp of green chilli paste (optional, I added because I like it)

Oil for frying

 CP_20

Method:

Mix all the dry ingredients in a big mixing bowl and then add 2/3 tbsp of oil in the flour mix. Give it a good mix then add rest of the wet ingredients in to it and start kneading. You will not need any water to knead as the grated courgette will release a lot of water. I found this step bit difficult as the dough is very sticky at this point. I put few drops of oil in my palms while kneading the dough, which helps to make the dough not sticking to hand. Continue kneading till you have a smooth dough. Make a log out of the dough and cut it into 12-14 equal portions. One by one take each portions and roll the in your palm to make small flat balls. Dip them in dry flour and set them aside. Dust the rolling plane with flour and start rolling each of the balls to thin parathas. Heat a heavy bottom frying pan and place one paratha and cook until you see little brown spot on the side facing down. Turn it over and cook till you see the brown spots again. Pour a teaspoon full of oil on and around the paratha and cook for 1 minute on both sides or until they are fully cooked. Serve them with your choice of veg or meat curry.

CP_44

I made simple potato with onion, tomato and cumin slowly cooked on low heat. 

Friday, November 19, 2010

Linguine with Smoked Salmon

I always look forward to the weekend. No matter where I am in the week, just the thought of weekend relaxing and chance to sleep more than the weekdays makes me feel relaxed. You might think I am such a lazy bum, but trust me, this trick works when you have mountains of work around you. Some weeks I have more work pressure than other. By the time I come back home, I am terribly tired and no energy left cook a meal. That is when I make my Speedy Linguine. This recipe takes less than 10 minutes to prepare and is an absolute pleasure.

 LS_364

Earlier to this post, every time I cooked this meal was in the night and been very tired so never really had the energy to take the photos. This time I made it in the weekend because, one it’s easy and fast, two I wanted to take the photos this time.  

LS_1129

Ingredients

Smoked salmon

Linguine (handful)

6-8 Cherry tomatoes

2-3 cloves of garlic

Red chilli flakes (optional)

Olive oil

Salt

Curly parsley leaves (handful - chopped)

 LS_358

Method:

Boil the linguine in salted water till al-dente. In a pan heat the olive oil and add the chopped garlic and fry till the aroma comes. Now add the red chilli flakes to it and fry for another minute before you add the salmon. After adding the smoked salmon immediately add the cherry tomatoes and chopped parsley, mix it well and don’t cook for more than a minute. Now add the cooked pasta, give it a good stir and check the seasoning. Remove from the heat after a minute. Garnish with some chopped parsley and drizzle some olive oil on top. Serve hot.

LS_371

Note: you can add some toasted pine nuts on top, really makes a difference (I didn’t because I was running out of patience :) ).

Wednesday, April 21, 2010

A Day Spent In The Racecourse


Last week I had a chance to spend an entire day in a racecourse - nicely dressed up, pamper myself to the posh, gorgeous looking delicious food, watch the races with great company, bet on the horses, get exited, enjoy and at the same time relax and have lots of fun. At the end of the day I realized how poor betting I had done as I lost most of the money that I bet, believe it or not in one race my horse actually came last, but I enjoyed it a lot. I left the race course with a very warm, relaxing and a genuinely happy feeling. 


It is not something I would like to do very often but definitely once in a while this sort of break is essential to take you away from your work and routine life, all your worries, stress, problems and all sorts of nasty thing that ties you so hard that you almost forget that you are also allowed to have little fun in life!  A bit of pampering, bit of indulgence, bit of decadence that's all you need to charge you up and ready to face the battle again .


So my pampering day started by getting up after 9 am in the morning (on a week day!!), got ready, went to office and waited for the coach to arrive. This was a corporate event so most people chose to take the coach as all of us can enjoy the ride together (official version). Actually it's the reason below, 

We arrived at the racecourse by 11.30 am and been escorted to our private dinner hall! We were welcomed with drinks. While we were seated a person from the racecourse staff explained to us how the betting works and how we can participate and enjoy the race. We were given booklets to guide ourselves towards betting (loosing money actually!!) Then we were served with the delicious four course meal. Here goes the menu.

The Starter


Poached salmon and prawn  tian with a cucumber , caper and lime salsa

The Main Course


Slow roasted loin pork glazed with honey and chinese five spice
Served with spring onion and new potato cake and buttered wilted greens


The Dessert


Pistachio and apricot bread and butter pudding with a Cointreau custard

The Cheese 

Mature cheddar, Somerset brie and stilton cheese served with in-house chutney and biscuits

Finally...

Coffee and chocolates

No no, it doesn't end there! After demolishing this lavish meal we went for racing and betting on horses, after 2 hours of continuous loosing money, we came back to our dinner hall for some proper English afternoon tea and enjoyed the last match on large LCD screens.

Finally at 6.00 pm we headed home and called it a night!  

Thursday, February 25, 2010

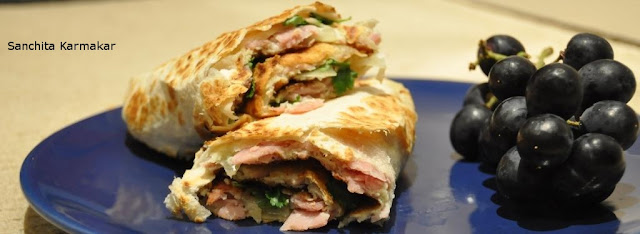
Mexican wrap with Ham & Egg

When I feel really lazy, hungry and don’t feel like cooking at all I make these wraps. This recipe is delicious and ready in 5 minutes, perfect for lunch (or even brunch if you are like me!!). I have used ham in this recipe but you can use any cooked meat, whatever you have in your fridge like left over cooked meat. In this recipe I have used 1 tortilla as it was quite filling for me but you can change the quantity as you prefer. So here goes the recipe...


Ingredients:

1 Tortilla wrap
2 Eggs
2-3 Slices of ham (chopped)
1 Onion (chopped)
1 Green chilly (chopped)
Few fresh coriander leaves (chopped) (optional)
Grated cheese
Butter
Oil  

********I didnt add any salt as the meat had enough salt in it.******* 

Method:

Spread little butter on both sides of the tortilla and place it on a heated frying pan. Heat it for a minute and then turn. This will give the tortilla a crispy outside. Don’t keep for long time as it might get hard. Remove it from the pan and keep it aside. 

Add oil/butter to the pan and beat the eggs with chopped onion green chilly and fresh coriander. Now add the ham in the mixture. When the oil is heated add this mixture to the pan and cook the omelette as you would like. Spread the grated cheese on top of the tortilla and place the omelette on top of it. Now wrap the whole thing and cut into halves and enjoy.


Sunday, February 21, 2010

Lamb Biriyani

This weekend was very special for me and my husband. It was our anniversary weekend, so thought of cooking something very special for this occasion, something that’s not an everyday dish. Some thing that is a real treat! So, I thought of making LAMB BIRIYANI. This is considered as a royal dish in India. Its basically rice, meat and potatoes cooked together. The original recipe requires lot of ghee/ butter, which is not so good for your heart. So I thought of cutting on the calories and make a low calorie version of the biriyani without compromising on the taste and have a guilt free treat. So here you go... 


For marination you will need:
Mutton/ Lamb-500 gms (or you can use beef as well)
Yogurt-200 gms
Ginger garlic paste-2 tablespoons
Meat tenderizer- 2 tablespoons
Shah Jeera powder-1 tsp
Cumin powder - 2tsp
Coriander powder - 2tsp
Red chilly powder -1 tsp
Cloves - 2 to 3 (crushed)
Green cardamom -2 to 3 (crushed)
Black cardamom powder- 2 tsp
Black pepper powder-2 tsp
Cinnamon powder-1tsp
Fried Onion-40 gm
Green Chillies-2 to 3 (crushed)

Rest of the Ingredients :

Basmati rice- 500gm
Potato- 2 (big size, peeled and cut into halves)
Coriander Leaves- 1 bunch
Mint Leaves- 1 bunch
Rose water- 2 tsp
Milk- 100ml
Saffron - a pinch
Butter- 20 gms
Oil for frying.

Method:

Wash the meat and add all the ingredients for marinating and marinate it overnight. 

Heat oil in a deep bottom non-stick pan, add the potato, fry till golden brown then add the marinated meat in to the same pan and cook in the low flame for next 50 minutes or till the meat is done. Keep stirring so that it doesn’t burn. Mean while half cook the rice, spread it on a plate and add the butter to it. Mix it with a fork and then add the saffron, rose water in the warm milk and keep aside.  

When the meat is cooked add the half cooked rice to the pan and mix it well. Now add the boiling water to it. Now this is critical, usually two portions of water is required to cook one portion of raw rice, but since the rice is already half cooked you will only need same quantity of water as the rice is. Mix the rice well in to the pan, add the coriander and the mint leaves, close the lid and cook until all the liquid is evaporated and the rice is cooked. Check for seasoning and take it off the heat. Serve hot with raita.

LinkWithin